
Hellraiser: Revival / The run planner
Recipe & materials
planner.
Track recipes. Check your supplies. Keep your place.
Manual checklist, saved in this browser. No game save is read. Covers 12 recipes and 11 route checkpoints. Reminders cover all five firearms and ten pillars; use the walkthrough for complete navigation and puzzles. How totals work · Jump to materials ↓
Where are you now?
Open the game’s Objectives menu, then match the objective and the landmark. “Hunt Marlowe” repeats: the shop number, Labyrinth visit or trapdoor tells you which checkpoint applies. This is a reference route, not an automatic game-progress reader.
Later story names and landmarks stay out of search until you reveal all later details. You can also open an individual disclosure below.
Checkpoint 01 / 11
Opening
Objective: Find Sunny, then Escape the Cult
Match the landmark: Chair escape, cult hallways and the first pistol pickup
Two recipes arrive on their own here. Grab every item as you go.
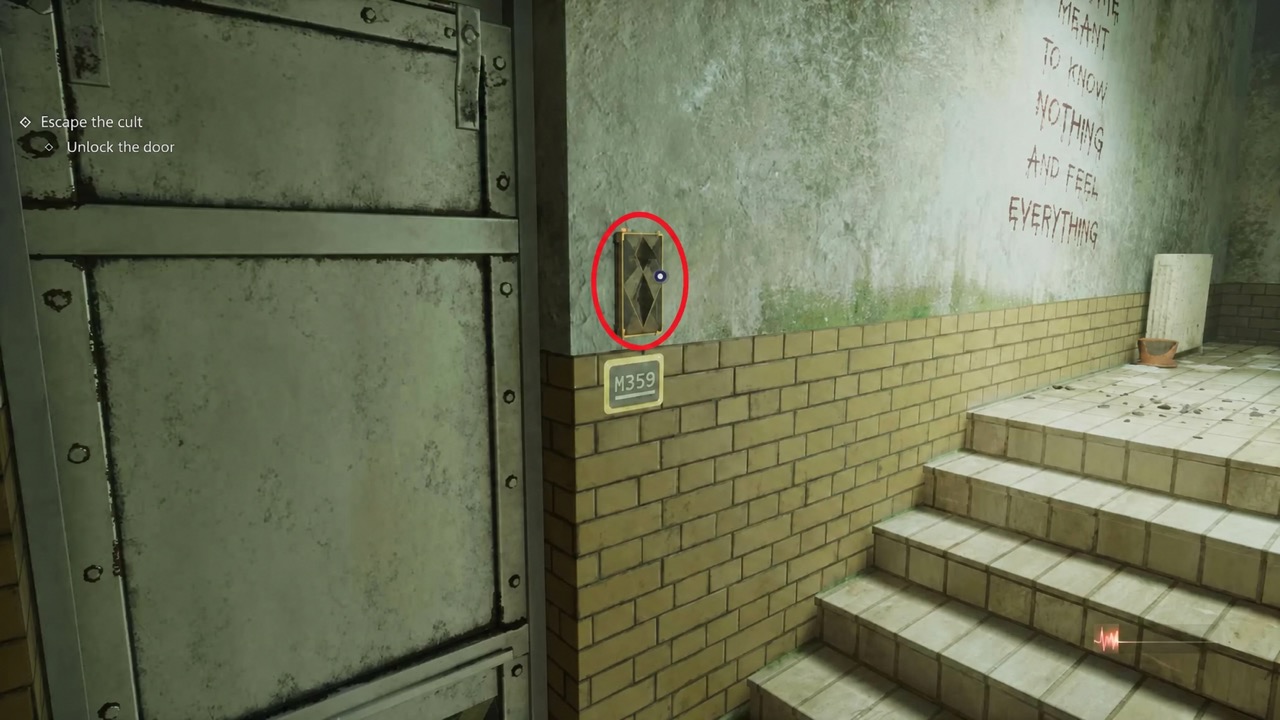
Image unavailable. Use the Find it and Do next instructions below.
Locate this checkpoint
Cult hallway: the metal door
- Find it
- Look for the metal door beside the tiled steps. The small control is above the small numbered plate, inside the source’s red circle.
- Do next
- Match “Escape the Cult” in your Objectives menu. Follow the power-reset sequence, then check the pistol pickup before leaving this opening area.
Route reminders: PowerPyx 100% walkthrough, 8 October 2026 . Published report, not our in-game verification.
Checkpoint 02 / 11
First shop
Objective: Get to Safety
Match the landmark: Zora at the top of the ladder after the sewer
Zora’s first shop, up the ladder after the sewer area. All three recipes cost 440 coins together.
Locate this checkpoint
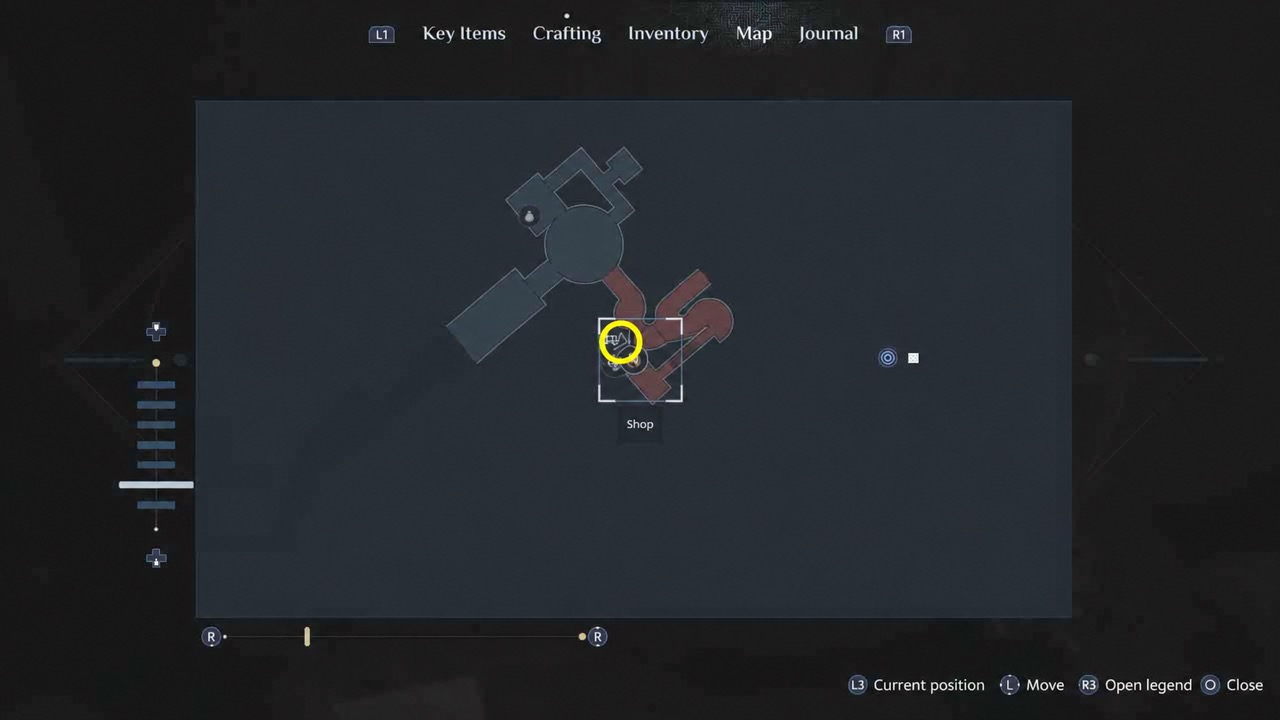
First shop: below the round room on the map
- Find it
- After the sewer ladder, open Map and look for the Shop icon below the circular room. The yellow ring surrounds the merchant marker, not a pickup.
- Do next
- Visit Zora and check the three recipe entries below. Buying a recipe and crafting it are separate tasks; update both in your ledger.
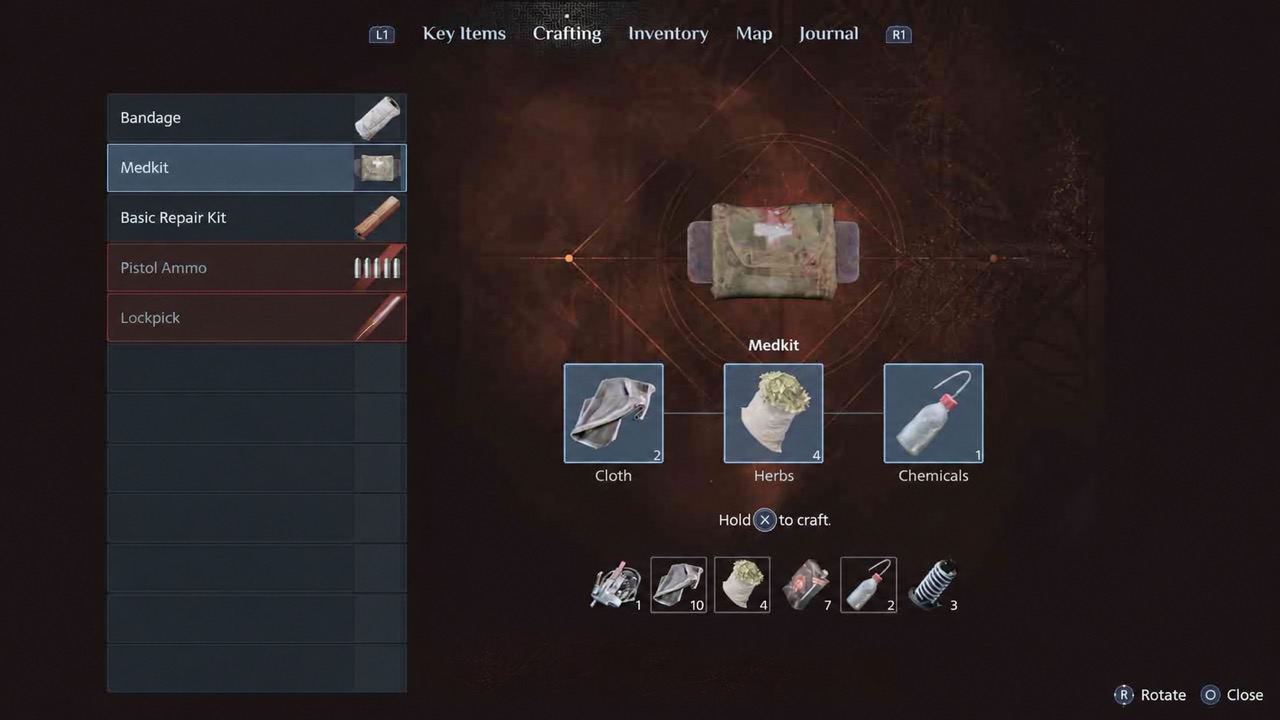
Read the Crafting menu: recipe cost vs inventory
Route reminders: PowerPyx 100% walkthrough, 8 October 2026 . Published report, not our in-game verification.
Checkpoint 03 / 11
Graveyard
Objective: Find a Way Out of the Graveyard
Match the landmark: Drop into the graveyard; body near the landing point and church save station
Check the firearm and saves before leaving this area.
Locate this checkpoint
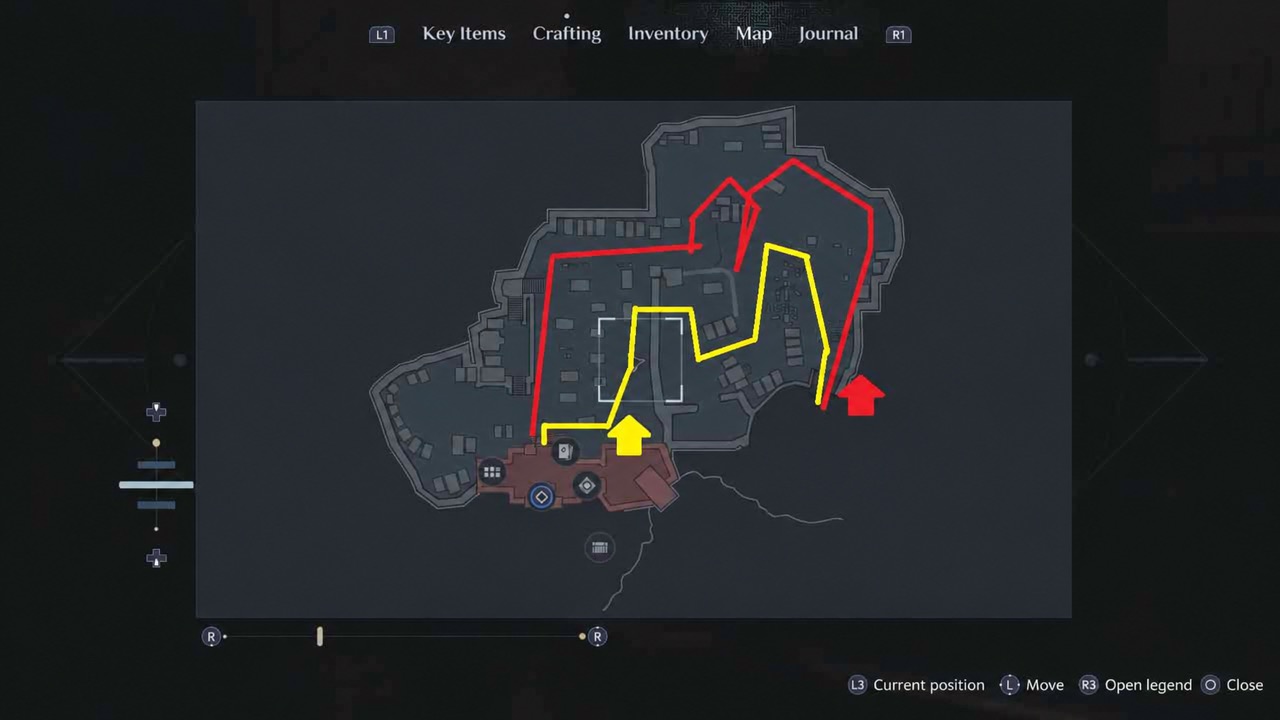
Graveyard: church to shack, then back
- Find it
- The church is at the lower left of this map. The outward path crosses the middle toward the shack on the right; the return path follows the outer right and upper edges back to the church.
- Do next
- Use the church as your starting reference. Check the shotgun near your landing point, then use the save reminders before heading out and returning.
The source marks the outward route in yellow and the return in red. These are reference paths, not a live enemy-position map or a guaranteed safe route.
Route reminders: PowerPyx 100% walkthrough, 8 October 2026 . Published report, not our in-game verification.
Checkpoint 04 / 11
Labyrinth pillars
Objective: Free Sunny’s Soul
Match the landmark: First return to the Labyrinth, after the graveyard
Not recipes: three pillars in this Labyrinth that are easy to run past.
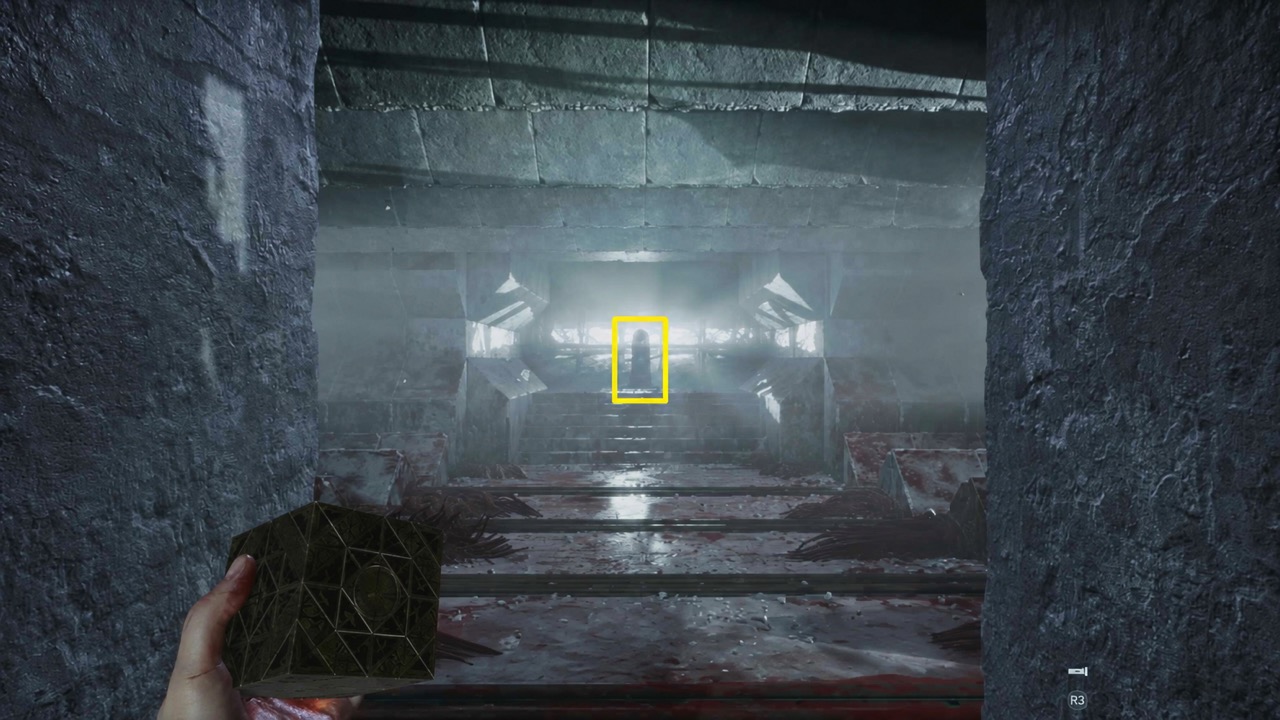
Image unavailable. Use the Find it and Do next instructions below.
Locate this checkpoint
First Labyrinth visit: the bloody trap corridor
- Find it
- Match the bloody entrance and the raised steps at the far end. The source’s rectangle marks the first Pain Pillar artifact beyond the trap corridor.
- Do next
- Use the first Pain Pillar reminder below to find the detour. Activate its artifact, then check the two separate Suffering Pillar reminders before continuing.
This image identifies the first health-pillar detour. It does not show the positions of all three pillars.
Route reminders: PowerPyx 100% walkthrough, 8 October 2026 . Published report, not our in-game verification.
Checkpoint 05 / 11
Second shop
Show later objectives, landmarks & reminders
Objective: Open the Gate to Charlotte
Match the landmark: Outdoor gate and Zora’s second shop, before the statue-piece route
Start this shop phase with Advanced Repair Kit and 12-Gauge recipes (400 coins together). Other recipes are added as you progress; the full five-recipe phase costs 840 coins.
Locate this checkpoint
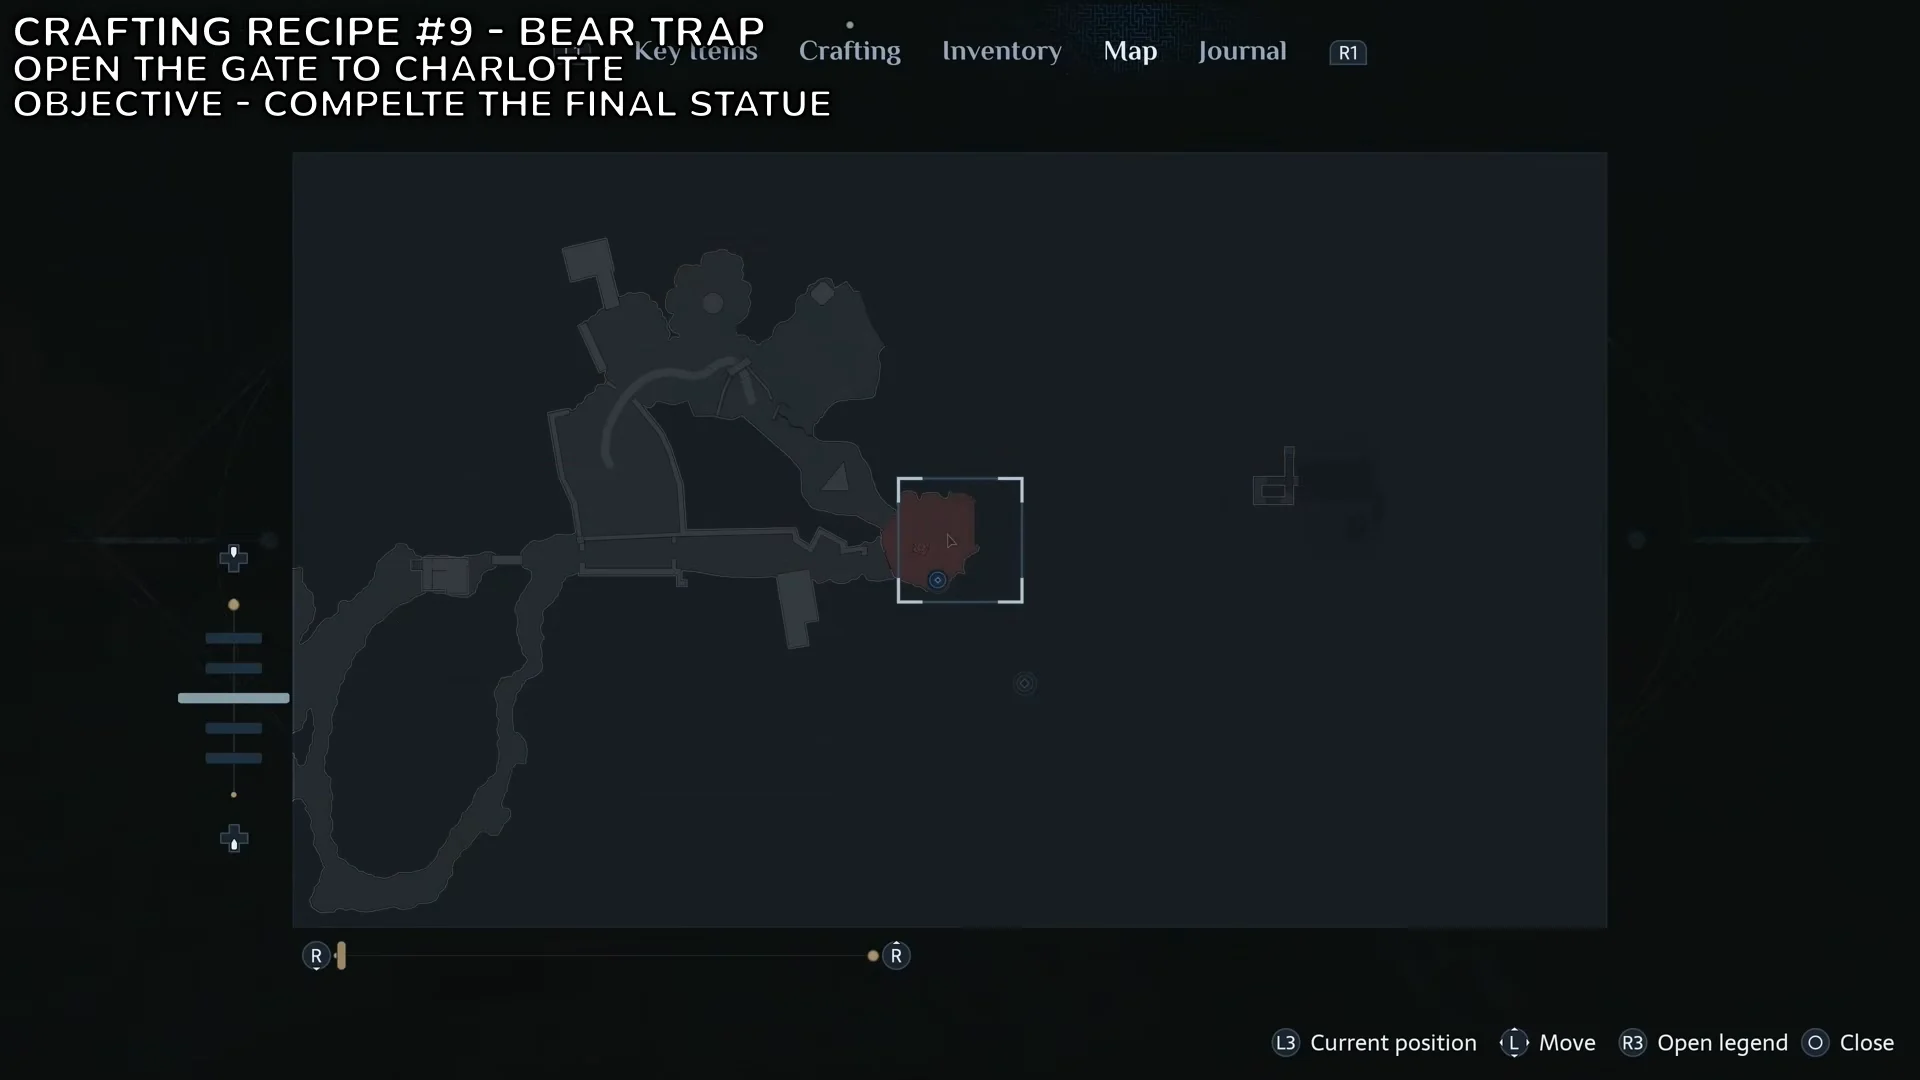
Second-shop hub: the eastern room
- Find it
- Match the hub’s curved paths and the room at the eastern end, outlined by the map cursor. This is the shared area you revisit during the statue objectives.
- Do next
- Check Zora’s initial two recipes before entering the mansion. Return after the Hand and Tongue objectives to inspect new stock; use checkpoint 06 for those visits.
The map frame was captured on a later return, during “Complete the Final Statue”. Its objective overlay is not your initial arrival objective. The mansion-door close-up below is a nearby landmark, not Zora’s counter.
Show nearby mansion entrance
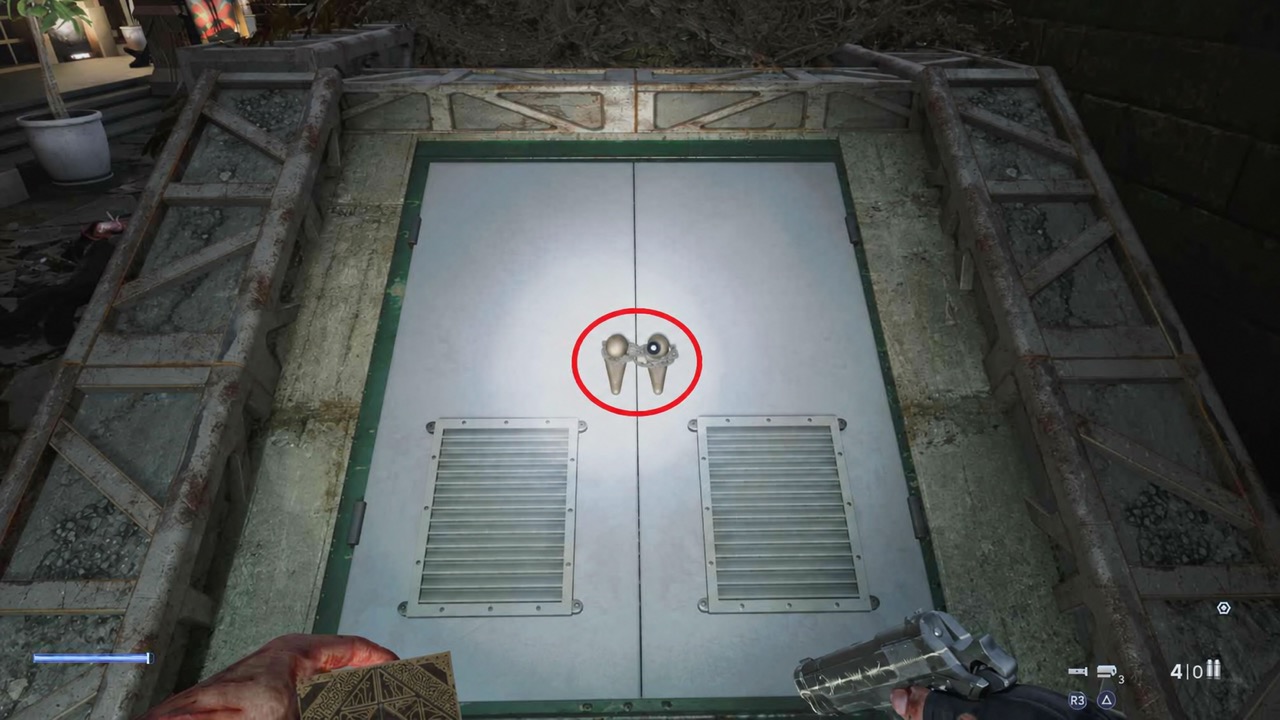
Image unavailable. Use the Find it and Do next instructions below.
Mansion double door framed in green, with the chain between its handles circled; this is the nearby mansion entrance, not a shop.
Route reminders: PowerPyx 100% walkthrough, 8 October 2026 . Published report, not our in-game verification.
Checkpoint 06 / 11
Second shop revisits
Show later objectives, landmarks & reminders
Objective: Find a Statue’s Missing Part → Find a Way to Exit the Mansion → Complete the Final Statue
Match the landmark: Mansion, swamp cabin and docks/well; repeated returns to the second shop
Different statue parts add different shop stock. Match both the objective and your landmark.
Locate this checkpoint
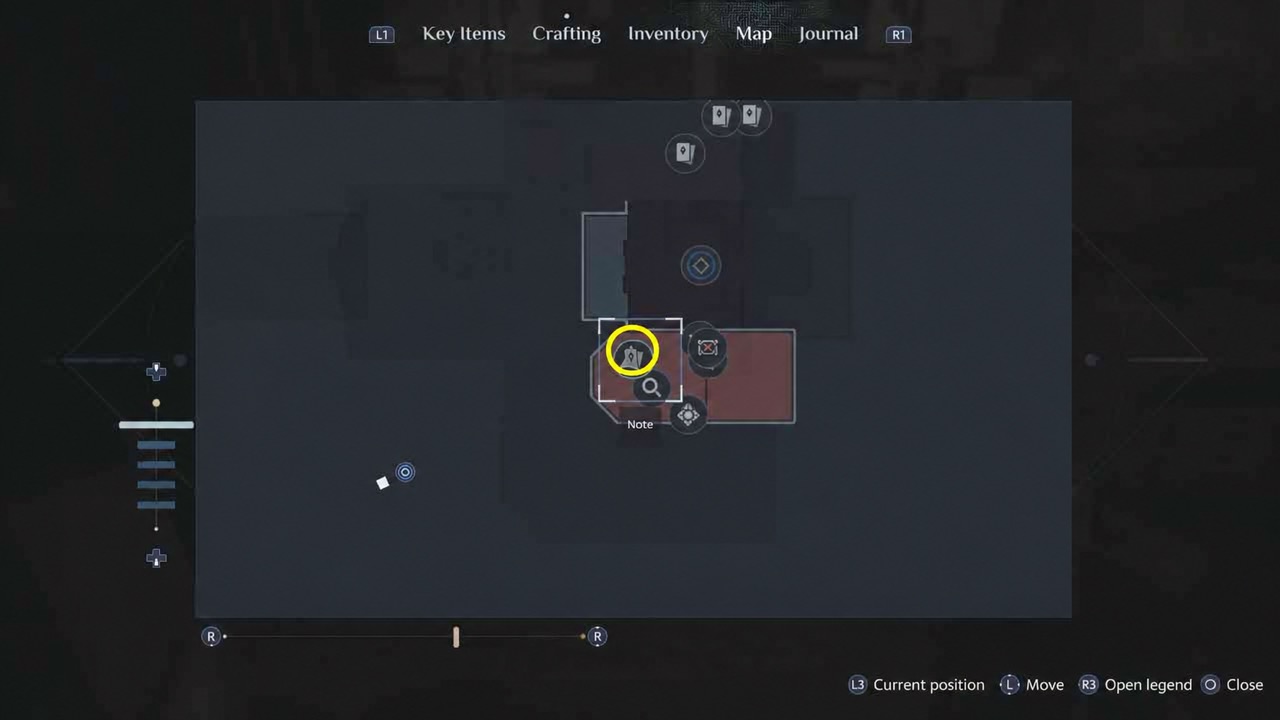
Mansion revisit: the upstairs safe
- Find it
- Match the upper-floor room south of the blue objective marker. The nearby Note is circled on the map; the close-up shows the large safe with a round lock and painting beside it.
- Do next
- Check the SMG safe reminder below before you leave the mansion. After the Hand pickup, return to the second-shop hub for 9mm stock; return again after the Tongue for the other two recipes.
The circled map marker is a Note beside the safe. It is not the SMG pickup itself. The safe photograph below is the visual target.
Show safe close-up
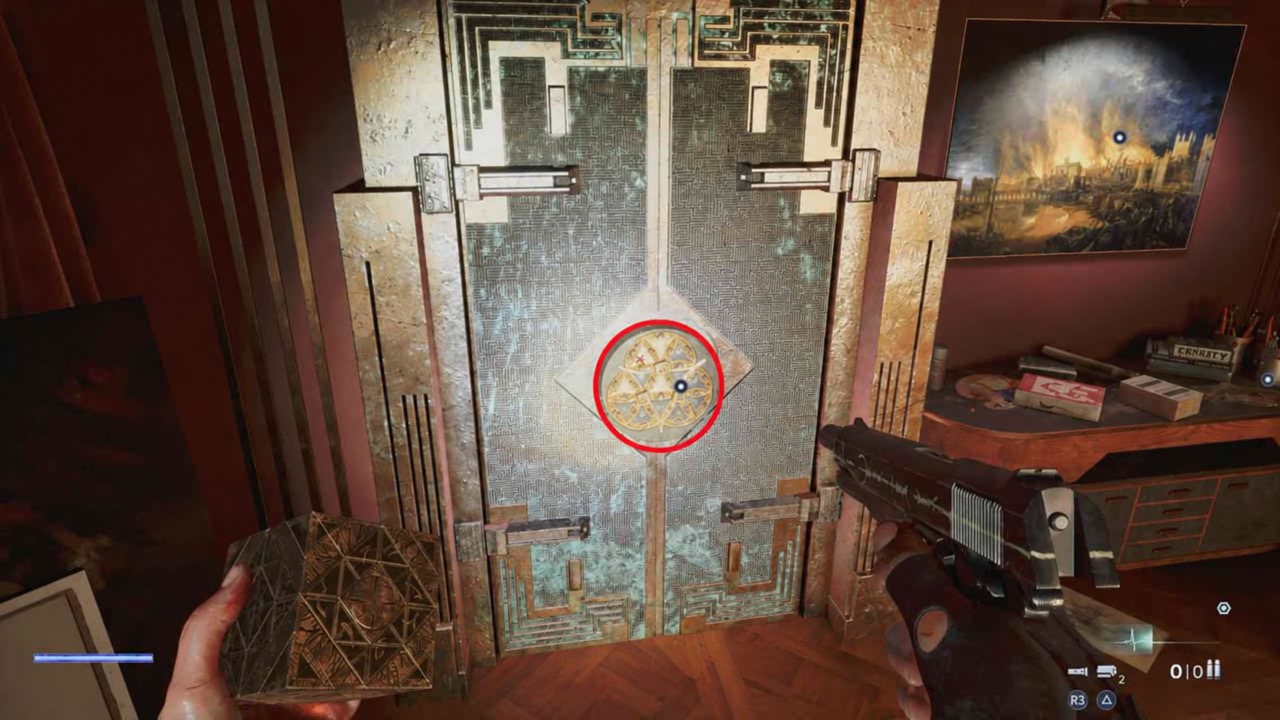
Large mansion safe with a circular gold lock circled on its doors, a painting to the right and papers on the adjacent desk.
Route reminders: PowerPyx 100% walkthrough, 8 October 2026 . Published report, not our in-game verification.
Checkpoint 07 / 11
Third shop
Show later objectives, landmarks & reminders
Objective: Hunt Marlowe
Match the landmark: Return from the Labyrinth after the first heart; Zora’s third shop
Check the two pillars before returning to the city. The third shop has the Assault Rifle and .357 recipe; 7.62 is added after another Labyrinth visit.
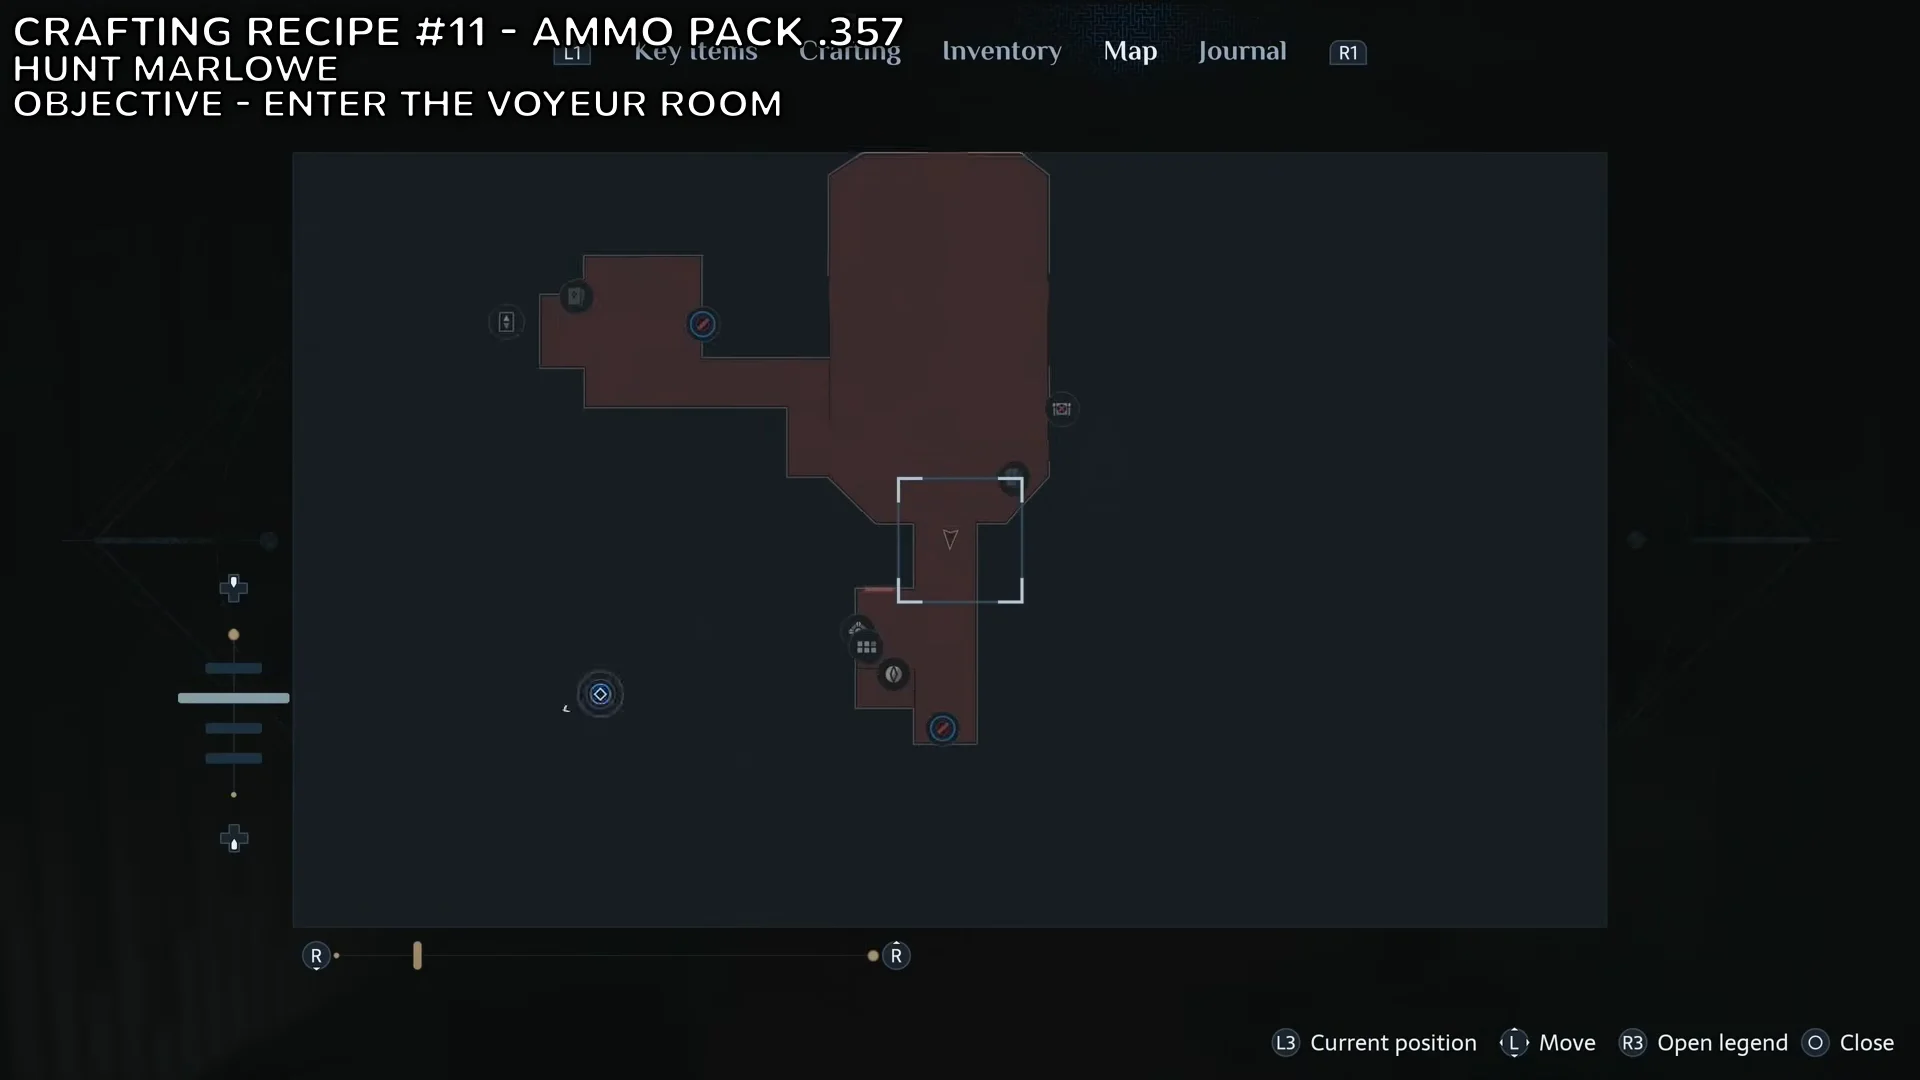
Locate this checkpoint
Third-shop visit: the long hall before the Voyeur Room
- Find it
- Match the tall central hall, its western branch and the narrow entrance at the bottom. The cursor in this reference is in that southern entrance.
- Do next
- Use “Enter the Voyeur Room” and the Snake Key rooms to distinguish this visit from later “Hunt Marlowe” objectives. Check .357 stock here; the 7.62 recipe belongs to the later Labyrinth-return visit.
This is an area map for the third-shop visit, not a marked merchant interior. If your map is incomplete or inaccurate, match the objective and physical landmarks instead.
Route reminders: PowerPyx 100% walkthrough, 8 October 2026 . Published report, not our in-game verification.
Checkpoint 08 / 11
Later Labyrinth
Show later objectives, landmarks & reminders
Objective: Enter the Voyeur Room → Get the Genesis Configuration Back → Exit the Labyrinth → Get to Marlowe
Match the landmark: Club route where the box is taken, then octagonal paths and moving stairs
Check both pillars before returning; then revisit the third shop for the last recipe.
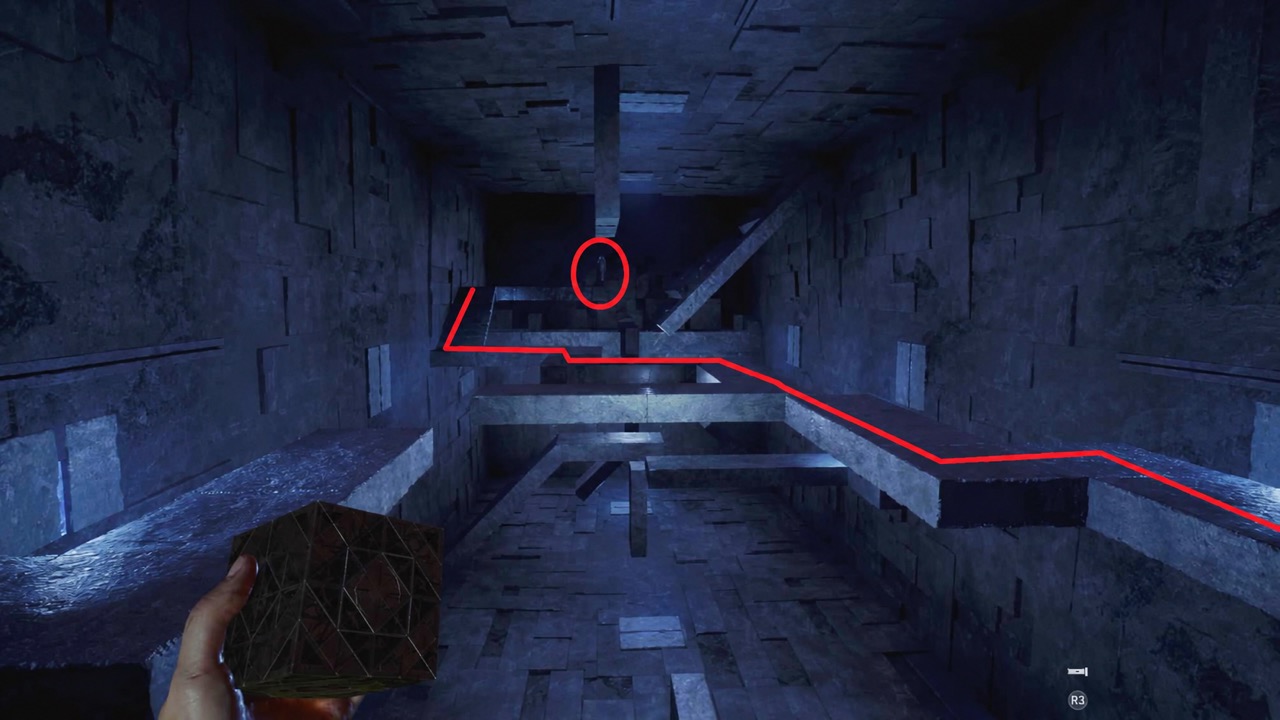
Locate this checkpoint
Labyrinth return: the rotating platforms
- Find it
- Look for the blue-lit room with raised walkways. Follow the red-marked route along the right-hand edges toward the circled artifact at the far end; the walkthrough identifies this as the rotating-section puzzle.
- Do next
- Align the second and third sections to reach the Suffering Pillar before leaving the room. Then follow the remaining reminders and check the third shop again after returning.
The platform route marks a pillar detour. It is not the location where you pick up the Genesis Configuration.
Route reminders: PowerPyx 100% walkthrough, 8 October 2026 . Published report, not our in-game verification.
Checkpoint 09 / 11
Fourth shop
Show later objectives, landmarks & reminders
Objective: Use the Elevator
Match the landmark: Leviathan beam area, followed by Zora’s fourth shop and the elevator objective
PowerPyx calls this “the last shop location where you have more time to do things.”
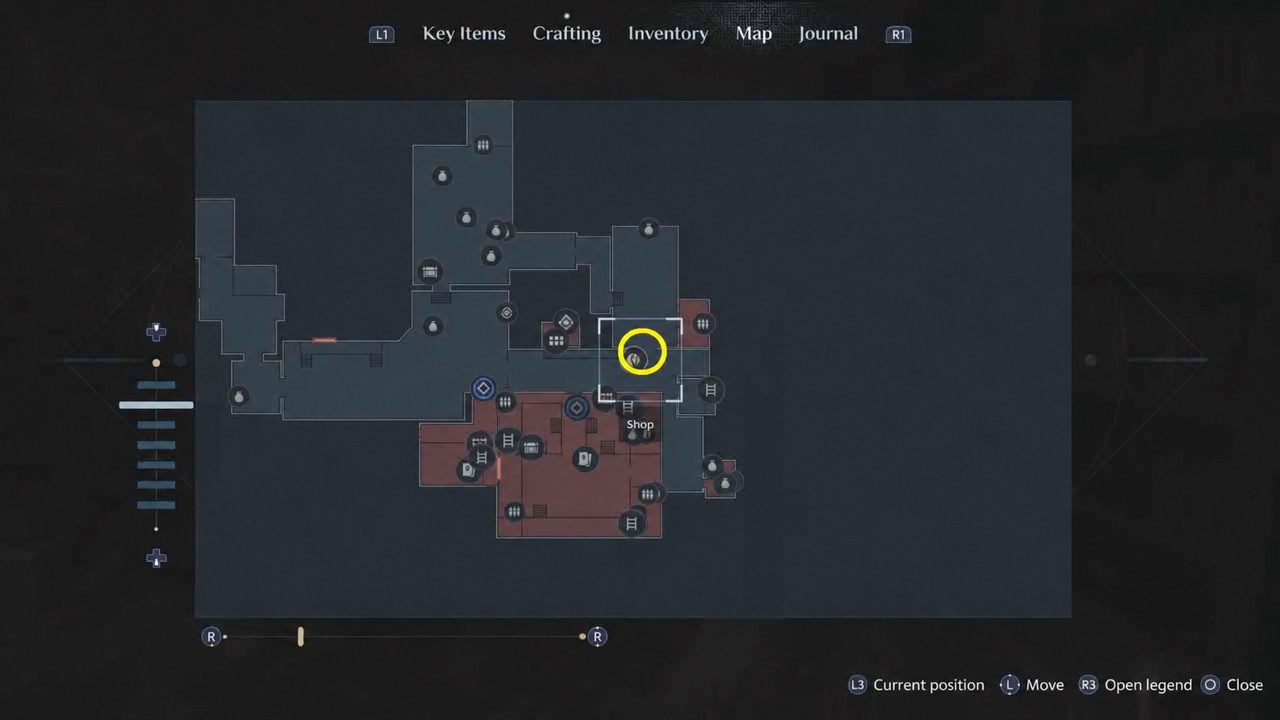
Locate this checkpoint
Fourth shop: the Shop marker and adjacent door
- Find it
- The Shop marker is circled on the right side of the central hall. Match the room connections rather than the player’s inventory cursor.
- Do next
- Finish recipe purchases and check your remaining material demand here. The Heart-Shaped Inset opens the door to the right of the merchant; its diamond panel is shown below.
The walkthrough reports map-display problems in this area. Use the diamond-panel door as the physical cross-check if your map does not match.
Show door beside the shop
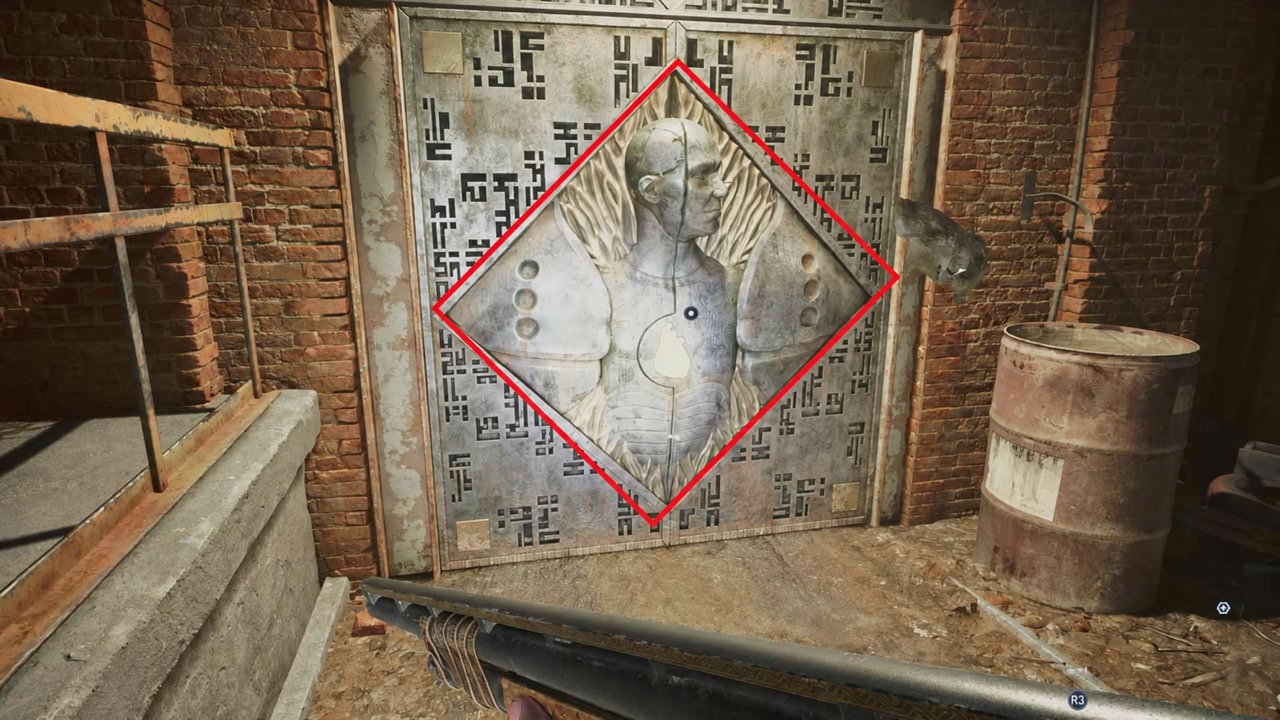
Image unavailable. Use the Find it and Do next instructions below.
Door beside the fourth shop, with a large diamond-shaped human relief outlined in red, brick walls and a barrel on the right.
Route reminders: PowerPyx 100% walkthrough, 8 October 2026 . Published report, not our in-game verification.
Checkpoint 10 / 11
Late return
Show later objectives, landmarks & reminders
Objective: Find and Use the Missing Bell → Reclaim the Genesis Configuration from Bruno → Hunt Marlowe
Match the landmark: Bell route, painted-door puzzle, then the later sewer room
Check the final health pillar before the trapdoor and final shop.
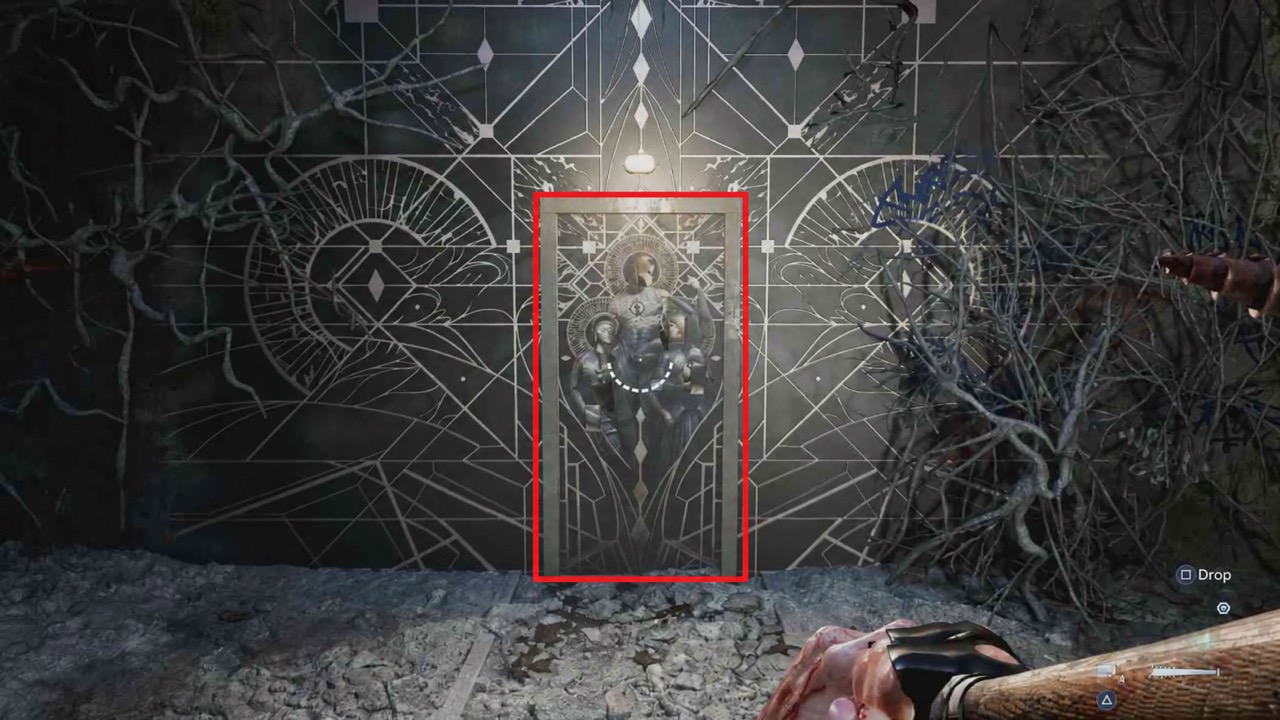
Image unavailable. Use the Find it and Do next instructions below.
Locate this checkpoint
Late Labyrinth return: the painted door
- Find it
- Match the narrow central door with painted figures, web-like lines across the surrounding wall and a lamp above it. The source rectangle marks the whole door.
- Do next
- Use the painted-door puzzle to reach the last Pain Pillar. Continue with the box-reclamation objective, then match the later sewer room before heading toward the final shop.
This doorway identifies the Pain Pillar detour within this checkpoint. The missing Bell is a different stop.
Route reminders: PowerPyx 100% walkthrough, 8 October 2026 . Published report, not our in-game verification.
Checkpoint 11 / 11
Final shop
Show later objectives, landmarks & reminders
Objective: Hunt Marlowe (last heading, after the trapdoor)
Match the landmark: Shop reached after climbing through the trapdoor, immediately before the final fight
Right before the final fight. PowerPyx says there is nothing left to collect and no enemies to defeat here.
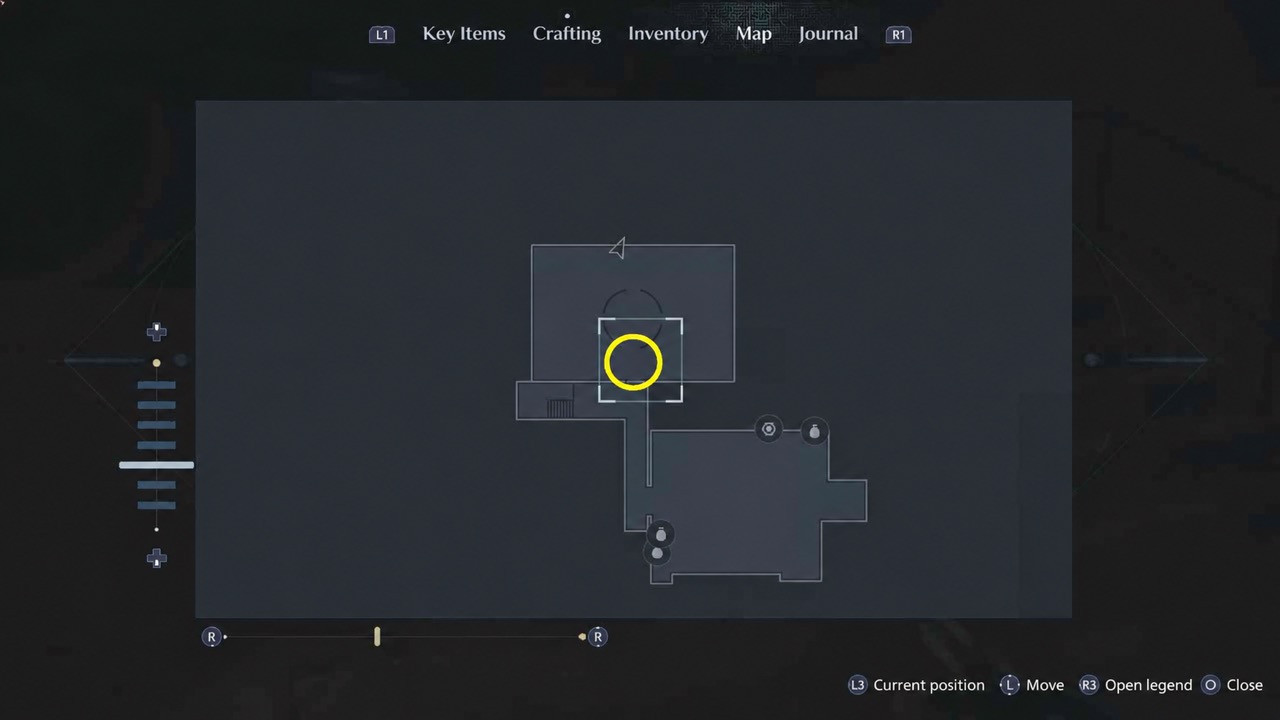
Locate this checkpoint
Before the final shop: the water-pool room
- Find it
- On the map, match the large rectangular room at the top, the yellow ring inside it and the narrow connecting corridor below. In the game, look for the two water pools and electricity switches; the close-up shows the lever mechanism above the stairs beside the pipes.
- Do next
- If you still see the pools, you have not reached the final merchant. Continue through the remaining route and climb out of the trapdoor; then check your final recipes and supplies before advancing.
Approach reference only: the map shows the room outline and a circled position, not individually labelled pools. Also, neither image shows the final shop interior or the trapdoor. Check the physical pools and switches before continuing.
Show approach landmark
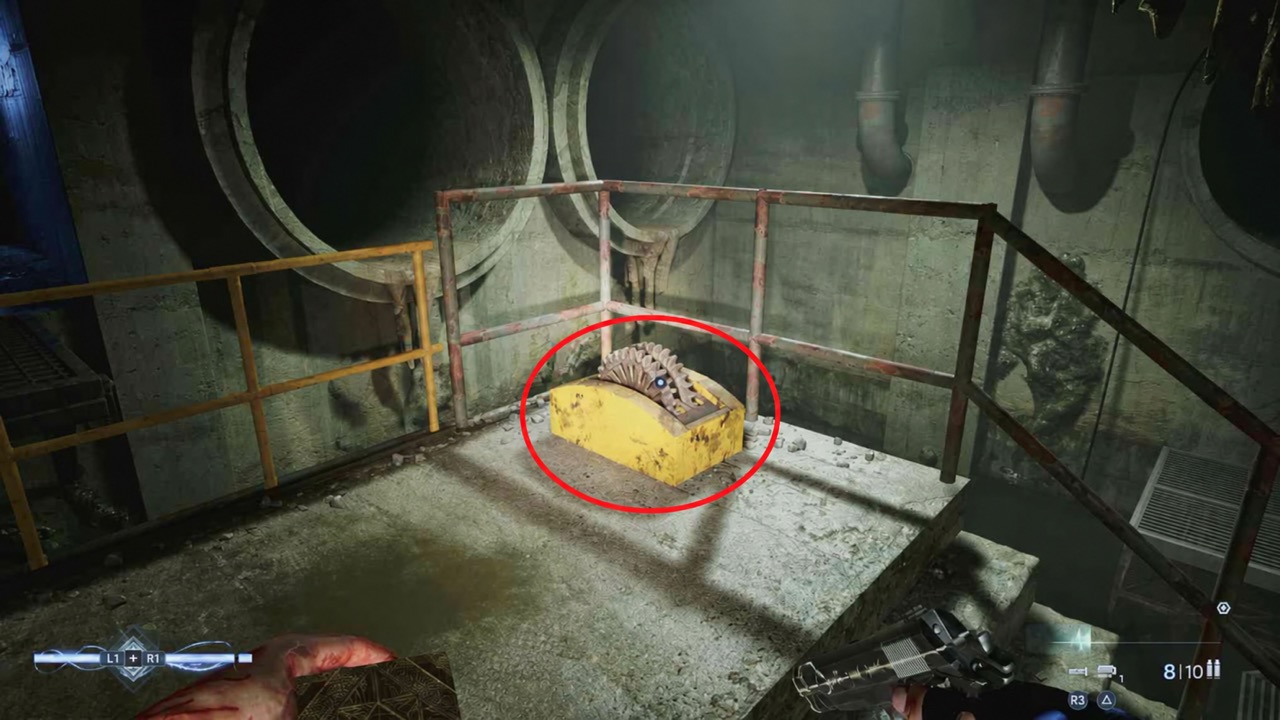
Image unavailable. Use the Find it and Do next instructions below.
Lever mechanism circled on a raised platform beside large pipes and stair railings, in the water-pool room before the final shop.
Route reminders: PowerPyx 100% walkthrough, 8 October 2026 . Published report, not our in-game verification.
Reminder ticks are separate from recipe ownership. Follow the recipe link and tick Acquired to update material totals. Changing checkpoints does not mark recipes complete or missed.
The recipe ledger
Acquired ≠ crafted.
Acquired means you own the recipe. Crafted means you have made it at least once. Track these independently; totals cover one craft of each acquired recipe not yet marked Crafted, not repeated batches.
Later acquisition names stay out of search until you reveal all later details.
Showing all 12 recipes
No matching recipes.
Try a recipe name or change the filter.
Bandage
Automatic, opening
Two reported costs. Match your game.
Acquisition & source
Objective: Escape the Cult → Free Yourself
Landmark: Automatic availability during the chair-escape opening.
Reported availability, not a verified last chance to acquire this recipe.
Open this checkpoint ↑Pistol Ammo
Automatic, with the pistol
Two reported costs. Match your game.
Acquisition & source
Objective: Escape the Cult → Outrun the Chatterer
Landmark: Pistol pickup after the flashlight and power-reset sequence.
Reported availability, not a verified last chance to acquire this recipe.
Open this checkpoint ↑Medkit
First shop · 200 coins for the recipe
2 Cloth1 Chemicals4 Herbs
Acquisition & source
Objective: Escape Charlotte → Get to Safety
Landmark: Zora above the ladder after the sewer.
Reported availability, not a verified last chance to acquire this recipe.
Open this checkpoint ↑Lockpick
First shop · 120 coins for the recipe
3 Scraps3 Coils
Acquisition & source
Objective: Escape Charlotte → Get to Safety
Landmark: Zora above the ladder after the sewer.
Reported availability, not a verified last chance to acquire this recipe.
Open this checkpoint ↑Basic Repair Kit
First shop · 120 coins for the recipe
1 Scraps1 Cloth2 Coils
Acquisition & source
Objective: Escape Charlotte → Get to Safety
Landmark: Zora above the ladder after the sewer.
Reported availability, not a verified last chance to acquire this recipe.
Open this checkpoint ↑Advanced Repair Kit
Second shop · 180 coins for the recipe
2 Scraps1 Cloth1 Chemicals2 Coils
Acquisition & source — later story details
Objective: Open the Gate to Charlotte
Landmark: Zora’s second shop before the statue-piece route.
Reported availability, not a verified last chance to acquire this recipe.
Open this checkpoint ↑Ammo Pack 12-Gauge
shotgun ammo
Second shop · 220 coins for the recipe
3 Scraps1 Cloth3 Gunpowder1 Chemicals
Acquisition & source — later story details
Objective: Open the Gate to Charlotte
Landmark: Zora’s second shop before the statue-piece route.
Reported availability, not a verified last chance to acquire this recipe.
Open this checkpoint ↑Ammo Pack 9mm
SMG ammo
Second shop · 140 coins for the recipe
2 Scraps3 Gunpowder2 Coils
Acquisition & source — later story details
Objective: Find a Way to Exit the Mansion
Landmark: Return to Zora after taking the Statue’s Hand and leaving the mansion.
Reported availability, not a verified last chance to acquire this recipe.
Open this checkpoint ↑Bear Trap
Second shop · 120 coins for the recipe
3 Scraps2 Coils
Acquisition & source — later story details
Objective: Complete the Final Statue
Landmark: Return to Zora after obtaining the Statue’s Tongue underground.
Reported availability, not a verified last chance to acquire this recipe.
Open this checkpoint ↑Fuel Can
Second shop · 180 coins for the recipe
2 Scraps3 Chemicals
Acquisition & source — later story details
Objective: Complete the Final Statue
Landmark: Return to Zora after obtaining the Statue’s Tongue underground.
Reported availability, not a verified last chance to acquire this recipe.
Open this checkpoint ↑Ammo Pack .357
revolver ammo
Third shop · 180 coins for the recipe
2 Scraps4 Gunpowder1 Chemicals
Acquisition & source — later story details
Objective: Hunt Marlowe — first third-shop visit
Landmark: Zora’s third shop after the intervening Labyrinth.
Reported availability, not a verified last chance to acquire this recipe.
Open this checkpoint ↑Ammo Pack 7.62
assault rifle ammo
Third shop · 200 coins for the recipe
4 Scraps4 Gunpowder
Acquisition & source — later story details
Objective: Hunt Marlowe → Get to Marlowe
Landmark: Return to Zora’s third shop after the next Labyrinth visit.
Reported availability, not a verified last chance to acquire this recipe.
Open this checkpoint ↑
Keep your progress
Take your plan with you.
Download a backup, then open this planner on another device and load that file. You can also paste its contents. Files are processed in this browser; this is not cloud sync or a game save.
Includes recipe ticks, cost choices, inventory, checkpoint reminders and story visibility. Search, filters and Undo history are not included. Clearing browser data can remove your saved plan; keep the file somewhere safe.
Paste backup text or copy your exported backup
This replaces your current plan. Download it first if you need to keep both. Undo can restore the previous plan during this visit.
Check the arithmetic
One shared shopping list.
Two recipes to craft
- Medkit: 2 Cloth + 4 Herbs + 1 Chemicals
- Lockpick: 3 Scraps + 3 Coils
Subtract stock once
Stock: 1 Cloth, 2 Herbs, 1 Chemicals, 2 Scraps and 1 Coils.
Shortage = max(0, total need − stock)
Still needed
- Cloth: 2 − 1 = 1
- Herbs: 4 − 2 = 2
- Chemicals: 1 − 1 = 0
- Scraps: 3 − 2 = 1
- Coils: 3 − 1 = 2
The same inventory is shared across your whole plan. Filters only change the displayed recipes, never the totals. Demo values are examples, not your game data.
Before you leave an area
Keep your crafting goals recoverable.
- Librarian · collect every recipe
- Use Acquired to record each of the 12 recipes you obtain in the game.
- Artificer · craft every item
- Use Crafted after you make each item at least once. Owning the recipe alone does not complete this goal.
These are manual reminders. A checked box or a 12/12 counter here does not verify or unlock an achievement in your game.
- PowerPyx’s 8 October trophy roadmap marks both crafting goals missable and reports no Chapter Select or post-story free roam. Keep earlier manual saves where your chosen difficulty allows them; reported cleanup requires reloading a save and replaying.
- Check what you still need to acquire and craft before advancing. Published acquisition points are not individually verified deadlines for every recipe.
- Use checkpoint reminders for shops and save preparation. For the complete route and other trophies, use the PowerPyx walkthrough ; later story details there are not hidden.
Goal definitions and recovery advice: PowerPyx trophy roadmap, 8 October 2026 . Published PS5 reference, not our current-build playtest. Compare difficulty and saving rules →